This is an old revision of the document!
Table of Contents
Ethanol sensor support page

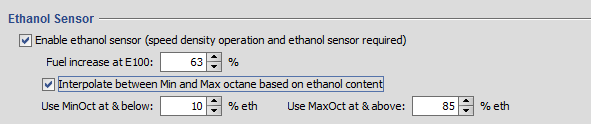
Ethanol sensors report ethanol content as a frequency from 50hz to 150hz corresponding to 0% and 100% ethanol. ECMLink can be configured to use the ECU's MAF input to read an ethanol sensor's output and then adjust the fuel mixture accordingly. ECMLink can also be configured to interpolate between the MinOct and MaxOct timing and fuel tables based on ethanol content.
Doing this requires speed density operation so as to free up the MAF input for the ethanol sensor signal and, clearly, you have to add an ethanol sensor installed as well. The sensor is typically installed on the return side of the fuel pressure regulator (i.e., between the fuel pressure regulator and the tank).
Due to variations in fuel system setup, the exact details of the physical installation will vary from one car to the next. So this page doesn't spend much time going over all those different options. We cover a few basics with the two most common configurations, but other than that, you'll need to carefully consider the particulars of your specific setup to determine the best option.
This page primarily focuses on the theory and software configuration options supported in ECMLink so that you have a good understanding of how ECMLink works with ethanol sensor data.
Physical installation
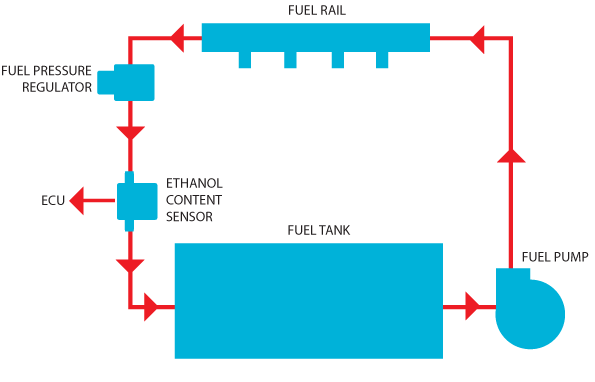 First, to help with the installation process, we have collected together various part numbers and such on our Ethanol sensor parts list reference page. That page also includes links to some sample installation examples from various other places on the web including this overview picture show to the right (click to enlarge).
Although there are probably a variety of different ways to run a fuel return system in a DSM, the two most common have either stock rubber hose or AN lines (typically -6AN) running from the fuel pressure regulator to the tank.
If you have a fairly stock return setup, then you should be able to get by without adapters. The factory rubber line is 6mm (1/4“) ID, but a little heat will allow you to slip the hose over the 3/8” sensor barbs.
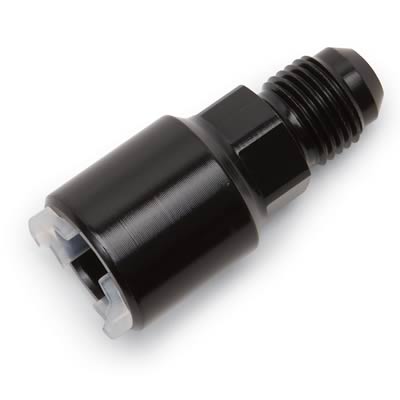
If you have an AN setup, then you'll need some way to adapt the sensor hardlines to the AN lines. The typical solution is a hard tube push-on fitting like the Russell adapter listed on our Ethanol sensor parts list page. These adapters push onto the ethanol sensor to basically convert the ends to AN fittings.
Once you've determined how to tee into your sensor into the fuel line, you'll need to decide how to wire it to the ECU.
Wiring
 The ethanol sensor has three pins: +12v, chassis ground and signal to the ECU. Conveniently, these pins are actually labeled on the sensor itself! Click on the image to the right to see these labels. Very nice. The manufacturer did not have to do that for us as these sensors are typically installed in production vehicles where there's no need for such information.
Our Ethanol sensor parts list page has links to the connector and pins needed to fit to this sensor. At some point, we may provide a simple modification to our SD cable that provides this connection for you. The adapter will look something like the one shown below (click to enlarge) and will simply snap into the MAF connector on the SD cable.

Once that's snapped into place, you'll have an SD cable with an IAT connector, a MAP connector and an ethanol sensor connector like shown below (click to enlarge).

If you're not running our SD cable or if you're looking to do this before we have that SD cable adapter ready, then the easiest option is to simply get the EFI Connection Part # 100-00741 pigtail and just wire it straight up yourself.
The ground connection needs to be run to chassis ground (i.e., do not use sensor ground off the TPS or MAF connector).
The power connection (labeled “Vcc”) needs to run to a +12v source. You can find +12v either straight off the battery (of course) or there's a +12v wire on the MAF connector harness too. This will be a thick red wire on pin 3 of a 1G MAF connector or pin 4 of a 2G/EVO3 MAF connector.
The signal wire (labeled “Out”) needs to run to the ECU's MAF input. This is pin 2 (green with blue stripe) on a 1G MAF connector or pin 3 (blue with yellow stripe) on a 2G/EVO3 MAF connector.
Operation
Once the sensor is installed and connected to the ECU, you can datalog various ethanol-related parameters to confirm operation even before you enable ethanol sensor operation in ECMLink. You can also view these parameters without starting the engine! Simply activate the fuel pump off the Misc tab to circulate fuel through the ethanol sensor so that you can test and adjust settings before starting the engine.
| Log parameter | Description |
|---|---|
| FlexFreq | Displays the sampled freqeuncy from the ethanol sensor. |
| FlexEthMix | Displays the ethanol content reported from the sensor as a percentage. A number like 85% indicates an 85% concentration of ethanol in the fuel. |
| FlexOctWeight | Displays the weighting given to the MaxOct tables based on ethanol content. A value of 100% means the MaxOct table is being used exclusively with no influence from the MinOct tables. A value of 50% means the MinOct and MaxOct tables are being averaged equally. |
| FlexFuelAdj | Displays the amount of fuel adjusment to be applied based on ethanol content and the ECU's configuration. A value of 0% would mean that no ethanol-related enrichment is being applied. A value of 50% means a 50% ethanol-related enrichment will be applied in the final injector pulsewidth calculation. Typical values for FlexFuelAdj are somehwere from around 6% for E10 and maybe 55% for E85. But this all depends on other parameters described below. |
The ethanol sensor settings are accessed in the AuxMaps tab in the ECU Config area.